
はじめに
ラズパイにアクセスする際にingressを介して行う必要があります。
いままでは、ingress nginx controllerを用いていたのですが、2026年3月で廃止することになったので、Kong ingress controllerとGateway APIを使った形に変更することにしました。
Kong ingress controllerについて
Kong Ingress Controllerで、URL振り分けをKongが実行してくれます。
そもそもingressとは、「このURLはどのServiceに流すか」 を書いたルール表(設定ファイル)です。
Ingressは以下のところにあります。
[インターネット]
      ↓
   Ingress
      ↓
   Service
      ↓
     Pod
この時、どのServiceに流すかをIngressが決めます。
/api → api-service
/blog → wordpress-servic
のような感じ。
ただし、Ingressは「設定」なだけで、実際に通信をさばく実体ではありません。
そこで登場するのが、Ingress Controllerです。
Gateway APIについて
Gateway APIはKubernetesで「外からの通信の入口」と「ルーティング」をきれいに役割分担して書けるAPIです。
以下のようにGatewayとその先にあるServiceへのルーティングを設定できます。
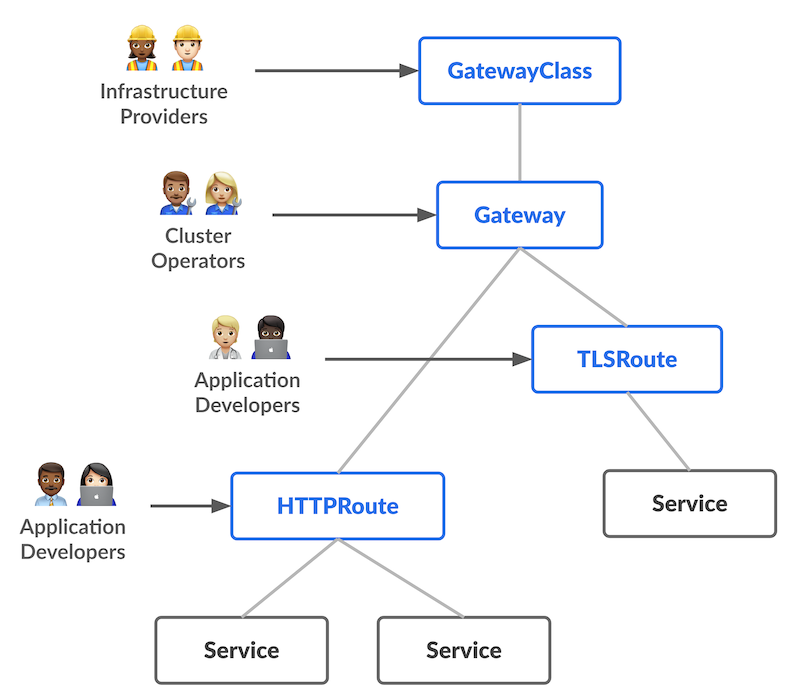
引用元: https://gateway-api.sigs.k8s.io/
実装
Kong
Kongをhelmでinstallしてきます。
$ helm repo add kong https://charts.konghq.com
$ helm repo update
$ helm install kong kong/ingress -n kong --create-namespace
各namespaceに追加の設定をしていきます。
以下のコマンドを実行します。
$ kubectl label namespace ref-voice shared-gateway-access=true --overwrite
$ kubectl label namespace gateway-system shared-gateway-access=true --overwrite
$ kubectl label namespace change-view shared-gateway-access=true --overwrite
この設定はnamespace間でアクセスできるようにするために設定しています。
Gateway API
Gateway API側の実装をしていきます。
最終的には以下のような構成となります。
GatewayClass
   ↓
Gateway(入口)
   ↓
HTTPRoute(ルーティングルール)
   ↓
[Service / Pod]
今回のディレクトリ構成は以下のようになっています。
.
├── charts
│   └── gw-config
│       ├── Chart.yaml
│       ├── templates
│       │   ├── gatewayclass.yaml
│       │   ├── ref-voice-gateway.yaml
│       │   └── ref-voice-httprouter.yaml
│       └── values.yaml
└── helmfile.yaml
helmfile.yamlは以下のようになっています。
releases:
  - name: gw-config
    chart: ./charts/gw-config
GatewayClass(上記ディレクトリ構成のgatewayclass.yaml)
GatewayClassでは、どのGateway Controllerを使うかを定義します。
以下のような記述になります。
apiVersion: gateway.networking.k8s.io/v1
kind: GatewayClass
metadata:
  name: kong-gatewayclass
  annotations:
    konghq.com/gatewayclass-unmanaged: "true"
spec:
  controllerName: konghq.com/kic-gateway-controller
払い出した後の確認は以下のようになります。
$ kubectl get gatewayclass
NAME                CONTROLLER                          ACCEPTED   AGE
kong-gatewayclass   konghq.com/kic-gateway-controller   True       6m55s
Gateway(上記ディレクトリ構成のref-voice-gateway.yaml)
Gatewayは入口(ロードバランサ / Listener)です。
ポート・TLS・ホスト名を定義します。
コードは以下のような記述になります。
apiVersion: gateway.networking.k8s.io/v1
kind: Gateway
metadata:
  name: ref-voice-gateway
  namespace: gateway-system
spec:
  gatewayClassName: kong-gatewayclass
  listeners:
  - name: https-listener
    protocol: HTTP
    port: 80
    hostname: ref-voice.cospa-tank.com
    allowedRoutes:
      namespaces:
        from: Selector
        selector:
          matchLabels:
            shared-gateway-access: "true"
払い出した後の確認は以下のようになります。
$ kubectl get gateway -n gateway-system
NAME                CLASS               ADDRESS         PROGRAMMED   AGE
ref-voice-gateway   kong-gatewayclass   192.168.40.13   True         3m43s
HTTPRouter(上記ディレクトリ構成のref-voice-httprouter.yaml)
URLやヘッダでの振り分けを定義してルーティングをしてくれます。
コードは以下のような記述になります。
apiVersion: gateway.networking.k8s.io/v1
kind: HTTPRoute
metadata:
  name: ref-voice-route
  namespace: ref-voice
  annotations:
    konghq.com/strip-path: "true"
spec:
  parentRefs:
  - name: ref-voice-gateway
    namespace: gateway-system
  hostnames:
  - ref-voice.cospa-tank.com
  rules:
  - matches:
    - path:
        type: PathPrefix
        value: /
    backendRefs:
    - name: ref-voice-frontend
      port: 5173
払い出した後の確認は以下のようになります。
$ kubectl get httproute -n ref-voice
NAME              HOSTNAMES                      AGE
ref-voice-route   ["ref-voice.cospa-tank.com"]   8m21s
そして、helmfile.yamlがある階層で以下のコマンドを実行すれば払い出しできます。
$ helmfile -f helmfile.yaml apply確認
ローカル(ラズパイ内)からアクセスして確認してみます。
$ curl ref-voice.cospa-tank.com
Blocked request. This host ("ref-voice.cospa-tank.com") is not allowed.
To allow this host, add "ref-voice.cospa-tank.com" to `server.allowedHosts` in vite.config.js.
アプリケーション側のproxyにはじかれていますが、それはつまり、アプリケーションまでのアクセスが確認できたことを意味します。
最後に
ingress nginx controllerの代替となる構成を組むことができました。
よかった、ホッと一安心。